ALL ABOARD: WE’RE GATHERING STEAM


Source: parents.com

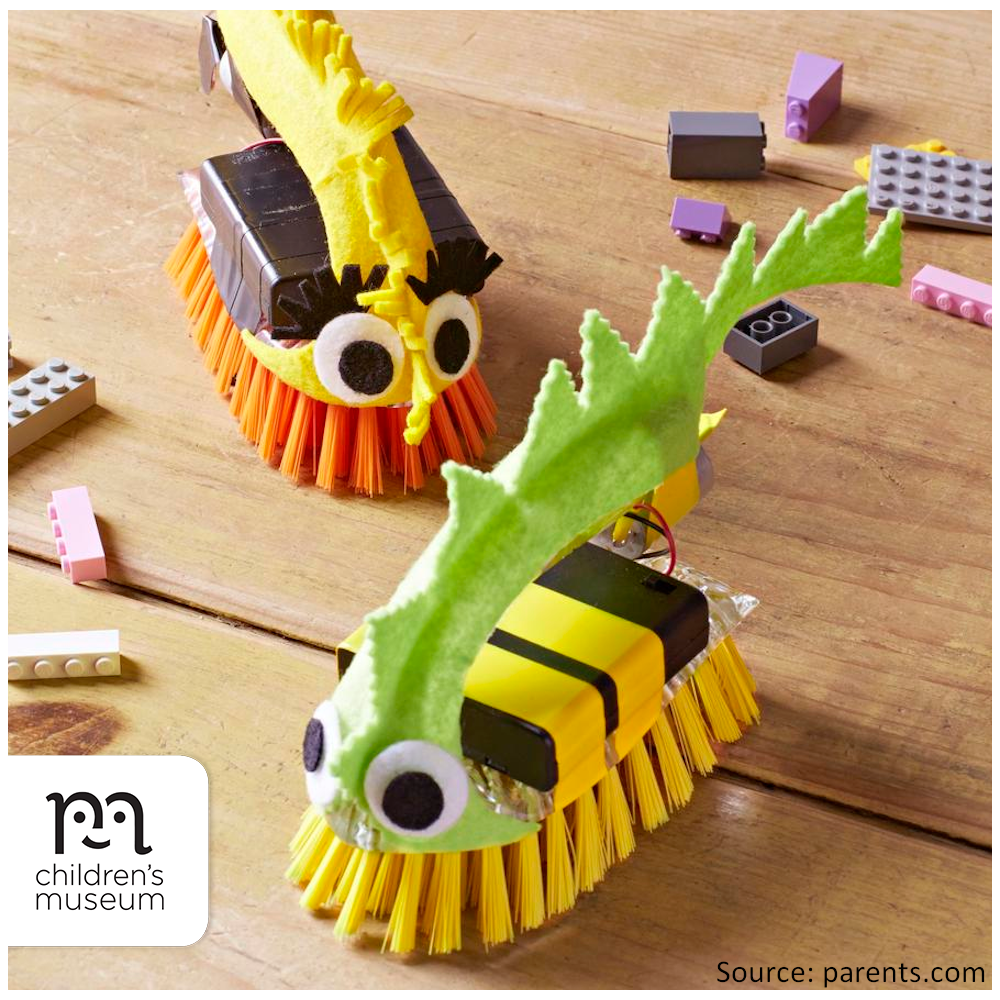
This fun and fun-to-build brushbot moves on its own. Just don’t expect it to clean the floors!

Materials

  • Four AA batteries
  • 6-volt battery case with wire lead terminals and an on-off switch
  • 6-volt hobby motor
  • Electrical tape
  • Washer, dime, or other small, flat object
  • Kitchen brush
  • Duct tape
  • Felt
  • Scissors
  • Tacky glue

Directions

  • Put batteries in the battery case. Connect the leads to the hobby motor (it doesn’t matter which colour lead connects to which), and secure the wires in place with electrical tape. Attach the washer to the motor’s shaft with electrical tape.
  • Attach the battery pack and motor to the brush with duct tape, and decorate as desired with felt and duct tape. (Just make sure you can still access the on-off switch!)
  • Turn it on to see it move on its bristle “feet.”

Spark Creative Learning!

This STEAM activity for kids creates a simple circuit, a closed path that an electrical current travels through. The battery provides the electricity, and the wires conduct it to the motor. When the motor’s shaft spins, the washer throws it off-balance, making the whole motor – and the brush along with it – vibrate and move.

ALL ABOARD: WE’RE GATHERING STEAM


Source: leftbraincraftbrain.com

What better way to learn about science than by eating it? Especially if it’s delicious. With this bread-in-a-bag project, kids can learn why bread rises and feel the pride of making homemade bread the whole family will want to eat! You can also do some experimenting to learn more about yeast before you get baking. See the yeast in action by proofing a packet of active dry yeast in warm water! Then, take your knowledge a step further by baking bread and sampling the results. Learn more.

ALL ABOARD: WE’RE GATHERING STEAM


Source: kaplanco.com

This DIY robot hand is a simple and inventive engineering activity that will teach children all about the world of robotics! With just three common items – straws, paper, and string – kids can create a moving, bendable hand. This activity encourages exploration of robotics, engineering, and creative thinking.

Materials

  • Standard drinking straws (paper or plastic)
  • Jumbo-sized straws (smoothie straws, paper or plastic)
  • White card stock
  • Scissors
  • Pencils
  • Yarn or string (various colours)
  • Tape

Directions

  • Trace hand (adult hand recommended for larger size) onto card stock. Cut hand outline out with scissors.
  • Place hand back onto paper hand to mark location of joints. Fold the paper hand at the marked joint locations.
  • Cut the standard straws into ¼”, ½”, 1″, and 2 ¼” sizes. Tape standard straws onto hand, and tape the jumbo straw onto the wrist.
  • Using a different yarn colour for each finger, cut five strands of yarn into 2-foot-long pieces. Be sure to knot one end of each piece of yarn. Thread one yarn strand through each finger. Have all colours meet at the wrist.
  • Pull on the strings individually and in combination to explore the wonder of robotic hands!

ALL ABOARD: WE’RE GATHERING STEAM


Source: nationalgeographic.co.uk

Kids won’t need beakers and microscopes for these four biology experiments – they just need themselves! Each of these experiments from National Geographic’s UK website lets children discover how a human body system works. And by doing these “tests” on their own bodies, they’ll get to see and feel exactly how their own systems function. Learn more and start experimenting.

ALL ABOARD: WE’RE GATHERING STEAM


Source: Boston Children’s Musem

Check out the Boston Children’s Museum’s online archive of kid-geared activities on their website. They have a huge range of content, from crafts and art activities, to book recommendations and cultural history, to lessons about science and nature. For example, you can learn about the museum’s friendly python, Ollie, or watch a demonstration of icy winter experiments on their YouTube channel.

You can also sign up for their activities email list and get notified every week when they post fun content and activities you can work on at home with your kids, as well as well as informative articles and podcasts about play and learning at home during this time of social distancing.

ALL ABOARD: WE’RE GATHERING STEAM


Source: steampoweredfamily.com

This bath bomb activity is meant to capture the sparkle of freshly-fallen winter snow. With this activity, kids can also study icicles and the way they look and reflect the light and see if they can think of ways to capture that feeling in the design of their bath bombs.

Materials

  • 2 cups baking soda
  • 1 cup citric acid
  • 1/2 cup cornstarch
  • 1/4 cup cream of tartar
  • 1/4 cup fine Epsom salts
  • 1/3 cup coconut oil
  • 1 tablespoon polysorbate 80
  • 10-20 drops helichrysum essential oil
  • 10-20 drops lavender essential oil
  • Light blue coloured mica powder
  • Glitter
  • Bath bomb molds
  • 2-3 cubes of white melt-and-pour soap base
  • Spray bottle filled with rubbing alcohol
  • 1 large mixing bowl
  • 1 small bowl
  • Microwave safe measuring cup
  • Spoon

Directions

  • In a large mixing bowl, add the baking soda, citric acid, cornstarch, cream of tartar and Epsom salts. Mix dry ingredients together.
  • In the measuring cup add the coconut oil. Heat in the microwave for a few seconds until it becomes a liquid.
  • Once melted, add the polysorbate 80, helichrysum essential oil, lavender essential oil, glitter and mica colour powder. Mix together with a spoon, then add to the large mixing bowl.
  • Mix all the ingredients together. I use my hands to break down any lumps and make sure everything is really mixed in there. The mixture is perfect when it holds together as you press it into your hands and feels like wet sand.
  • Take one mold and fill each side with the mixture until it is overflowing a bit. Press both sides together, using a twisting/grinding motion to get rid of any excess mixture. Gently tap each side and carefully remove the bomb. (This takes some technique and practice. Be patient. You can repack and try again as often as you need to until you get the knack of it.)
  • As you progress through making the bath bombs, you may need to spray the mix with rubbing alcohol to moisten it, so they continue to bind together.
  • Allow the bath bombs to dry for a minimum of 24 hours. A rule of thumb is that when they are hard to the touch, they are ready for the final stage: the glaze!
  • Place soap cubes into a microwave safe bowl and melt for 30 seconds and stir. Continue to melt in 30 second intervals until completely melted. You can add some glitter here or wait for the glazing stage.
  • Using a condiment or hair colouring bottle or spoon, drizzle the soap over the bombs to give them the effect of icicles. If sprinkling the glitter, do it before the soap glaze hardens.
  • Let set overnight before wrapping or packing in an airtight container.
  • Give as gifts or keep for yourself!

Using Your Icicle Bath Bombs

To use, simply fill your bath with warm water and plop the bath bomb in! Enjoy the fizzy bath bomb fun! Bath bombs are best used within a couple of weeks. Overtime the strength of the reaction will diminish.

Bath bombs must stay dry until you are ready to use them. They can be wrapped in plastic or placed in an airtight container.

Spark Creative Learning!

Bath bombs are an acid-base chemical reaction. In this recipe we have baking soda as our base and citric acid and cream of tartar as our acids. Cornstarch is a fantastic filler that helps keep our acid and base ingredients dry. This is important, because as any young scientist will tell you, when acids and bases come together, they react, but not when they are in a dry solid state like our bath bombs. To trigger the chemical reaction we need water to make the magic happen.

Another ingredient you may not recognize from the list is polysorbate 80. This is an emulsifier that helps oils mix with water. This is very important in bath bombs, where you want the ingredients to mix in with the bathwater and not float on the top like a layer of scum and stick to the sides of the bathtub. Plus, the science of emulsifiers is pretty cool – finding a way to make fat and water mix is fascinating for young scientists.

ALL ABOARD: WE’RE GATHERING STEAM


Source: explorerfieldtrips.com

The iconic San Francisco science museum Exploratorium has a wonderfully resource-filled website that’s great for kids – and families – to discover. Over the years, Exploratorium has gathered and shared information from artists and scientists across the world, and their website is a treasure trove of inspiration.

They have tons of learning resources under subjects like Astronomy & Space Sciences, Engineering & Technology, Social Science, History, and more. Visitors can also browse by content type, such as activities, video posts, websites, and more. Get inspiration for a quick and simple activity with Science Snacks! Their 35,000+ pages of web content is a perfect place to start exploring the world through science, art, and human perception. 

ALL ABOARD: WE’RE GATHERING STEAM


Source: playgroundparkbench.com

During the holidays, try using peppermints and candy canes as math manipulatives in your family’s projects!

Since birth, children are measured and weighed at every doctor visit. From an early age, they quickly hop on the scale or ask how tall they are. But what does that number mean? And how are different things measured? Typical units of measurement can be a bit abstract for preschool mathematicians, but you can still introduce and explore the concept of measurement with them using more familiar, tangible units. For the holidays, you can explore measurements with candies, using peppermints for weight and candy canes for length.

Weighing Objects with a Balance Scale

If you don’t have a balance scale, you can make a simple DIY balance scale with cups, string, and a coat hanger. Place your scale on a level surface or hang your DIY version from the back of a chair or a hook, and let your preschooler weigh various objects. Instruct them to place an object in one cup, and add weights – in this case peppermints – to the other cup until the scale balances. How many ‘peppermints’ did each of your objects weigh? Which object was the heaviest? Which one was the lightest? Did any objects weigh the same?

Measuring Lengths with Candy Canes

You can also move on to measuring lengths. Using candy canes like rulers, preschoolers can measure countless objects around the room. Demonstrate how to lay the candy cane along the length of the object starting at one end. Lay candy canes end to end to measure the full length of each object. What was the tallest object you measured? What was the smallest?

For Older Kids

Older students can still enjoy these basic measurement activities. You can make it more of a challenge for them by asking them to convert their weights and lengths from units of peppermints and candy canes to actual grams and centimetres!

ALL ABOARD: WE’RE GATHERING STEAM


Source: littlebinsforlittlehands.com

Turn a leftover piece of styrofoam into a geoboard-inspired work of art with your kids. A few simple supplies and you can explore math and art with a bit of engineering as you make a beautiful flower or two.

Materials

  • Thick styrofoam, preferably reused – you could trying using electronics packaging if you have some!
  • White trim screws (one inch long or longer would be fine, depending on the thickness of the styrofoam)
  • Loom bands in a variety of colours
  • Pencil to trace your design on the styrofoam

Directions

  • Sketch a flower design on the styrofoam first if you want. If you don’t sketch a design directly on the foam, you’ll be able to reuse your foam blocks to create a variety of different geographic shapes!
  • Gently poke your trim screws or nails into the corners of your design.
  • Now it’s time to get creative with your rainbow loom bands. Make different shapes to design the flowers and then add shapes within the shapes if you like.
  • Check out pictures of flowers online for inspiration! Think about how you can turn a picture of a real flower into multiple shapes.
  • Take out the trim screws, pull off the loom bands, and make another design!

Spark Creative Learning!

A geoboard is a tool for exploring a variety of mathematical topics introduced in the elementary and middle grades. Learners stretch bands around the pegs to form line segments and polygons and make discoveries about perimeter, area, angles, congruence, fractions, and more. Check out this cool online geoboard simulator in addition to making your own!

ALL ABOARD: WE’RE GATHERING STEAM


Source: kiwico.com

Explore the science behind how your heart works with this simple heart pump model activity!

Materials

  • Small jar
  • Two bendy straws
  • Balloon
  • Tape or glue
  • Water
  • Red food colouring

Directions

  • Cut the neck of the balloon where the balloon starts to widen.
  • Fill a jar halfway with water and add 3 drops of red food colouring. This will act as the “blood” pumping through the heart!
  • Stretch the balloon top over the jar. Keep stretching the balloon to make sure it lays flat across the mouth of the jar.
  • Use scissors to carefully snip two small holes into the balloon, about 1 inch away from each other. Make sure each hole is big to fit the width of the straw, but small enough so that the balloon is tight around the straw, preventing the air from escaping between the straw and the balloon. Also, tape the end of one of the straws. (If you cut the holes a bit too big, use tape to patch the side of the straws.)
  • Now it’s time to pump your heart! Place your heart pump on a tray – this might get a little messy! Use your fingers to press down into the balloon between the two straws. Watch the “blood” pump out from the one open straw.

Spark Creative Learning!

The action of a real heart is much more complicated than this simple model, but the heart really is a pump! With every heartbeat, muscles in your heart contract and squeeze the chambers (or open spaces) within your heart, just like your finger poking into the balloon. This squeeze pushes the blood in the chamber and moves it out of your heart and into your arteries. In your balloon heart model, the water “blood” gets pushed up and out the straw “artery.” Your heart does this an average of 70 times every minute, pushing your blood all the way around your body and back to your heart again!