CREATION STATION: GIRAFFE CRAFT


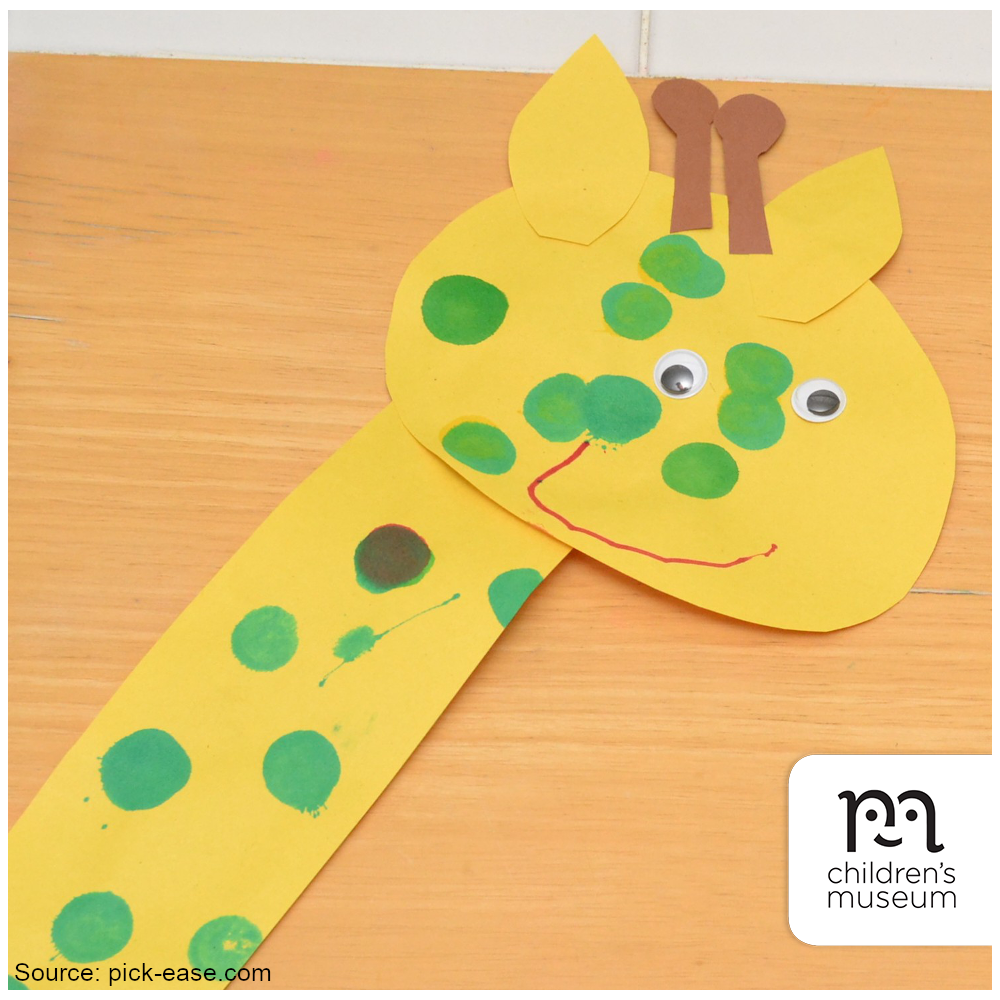
Source: pick-ease.com

Make a simple giraffe craft with your kids! Start by cutting out the individual giraffe shape pieces (pictured here) ahead of time, then have the kids glue the pieces in the appropriate spots to build their giraffe. Once the giraffes are assembled, use markers, bingo dabbers, Do-A-Dot markers, or other drawing tools to make spots! Display on your fridge or continue and make a zoo’s worth of animals.

ALL ABOARD: WE’RE GATHERING STEAM


Source: modernhomesteadmama.com

What kid doesn’t love cookies? And oreos make for the perfect little moon replicas. Get a free downloadable phases of the moon worksheet here, and help your kids learn the phases of the moon during snack time.

Beforehand, get kids to study the names and corresponding phases of the moon (at NASA’s Space Place website, for example), and then recreate them from memory with oreo cookies and this handy free downloadable worksheet.

CREATION STATION: FOUR-LEAF CLOVER CANVAS ACTIVITY


Source: messylittlemonster.com

Display this clover canvas on your wall and brighten up your house, or the kids could give it to someone special as a thoughtful gift.

Materials

  • Q-Tips
  • Green craft paint
  • Paper plates
  • Small blank canvas
  • Green or brown fine tip marker

Directions

  • Gather and layout all of your supplies. Cover the surface you’re working on just to be safe – we’re working with green paint, after all! Start by applying a small amount of green craft paint on the paper plate – it’ll be easier to access it this way.
  • Dip the Q-Tip in the green paint. You can give it a few tries at first, and practice dabbing on the paper plate or a paper towel at first until you get the hang of it. 
  • You want to use the Q-tip as a stamp. Just dab, press and release to create the small leaves of your clover. You can do three or four-leaf clovers (or shamrocks), or both, to have more variety in your design. 
  • Keep creating clusters of little leaves using the Q-Tip as a stamp until you’re happy with your work. Let it dry once you’re done. 
  • To add the finishing touches to your clover canvas, check the paint is dry, and then use a fine tip marker to create a stem for each clover. Just make a quick and fine line below each clover. 
  • You’re done! Now you can display your fabulous painted canvas any way you want to. You could frame it or add a ribbon to hang it up on the wall.  It would also make a great gift to give to someone for St. Patrick’s Day. 

ALL ABOARD: WE’RE GATHERING STEAM


Source: parents.com

This fun and fun-to-build brushbot moves on its own. Just don’t expect it to clean the floors!

Materials

  • Four AA batteries
  • 6-volt battery case with wire lead terminals and an on-off switch
  • 6-volt hobby motor
  • Electrical tape
  • Washer, dime, or other small, flat object
  • Kitchen brush
  • Duct tape
  • Felt
  • Scissors
  • Tacky glue

Directions

  • Put batteries in the battery case. Connect the leads to the hobby motor (it doesn’t matter which colour lead connects to which), and secure the wires in place with electrical tape. Attach the washer to the motor’s shaft with electrical tape.
  • Attach the battery pack and motor to the brush with duct tape, and decorate as desired with felt and duct tape. (Just make sure you can still access the on-off switch!)
  • Turn it on to see it move on its bristle “feet.”

Spark Creative Learning!

This STEAM activity for kids creates a simple circuit, a closed path that an electrical current travels through. The battery provides the electricity, and the wires conduct it to the motor. When the motor’s shaft spins, the washer throws it off-balance, making the whole motor – and the brush along with it – vibrate and move.

JOIN US FOR FRANCO-FUN DAY AT THE CHILDREN’S MUSEUM


Source: allrecipes.com

Today is Franco-Fun Day at the Children’s Museum, and we’d like to celebrate with you by sharing this easy-to-make bannock recipe!

Ingredients

Directions

  • Measure flour, salt, and baking powder into a large bowl. Stir to mix. Pour melted butter and water over flour mixture. Stir with fork to make a ball.

Join us today at the Children’s Museum for Franco-Fun Day activities celebrating French-Canadian culture until 3:00PM! Learn more.

ALL ABOARD: WE’RE GATHERING STEAM


Source: leftbraincraftbrain.com

What better way to learn about science than by eating it? Especially if it’s delicious. With this bread-in-a-bag project, kids can learn why bread rises and feel the pride of making homemade bread the whole family will want to eat! You can also do some experimenting to learn more about yeast before you get baking. See the yeast in action by proofing a packet of active dry yeast in warm water! Then, take your knowledge a step further by baking bread and sampling the results. Learn more.

CREATION STATION: SKUNK VALENTINE CRAFT


Source: iheartcraftythings.com

A sweet skunk for Valentine’s Day! If you’re making this fun craft with toddlers or preschoolers and feel the 3D heart is too complicated for them to make, simply omit that step and have them glue one single heart on their animal.

Materials

  • Animal valentine templates
  • Coloured cardstock paper or construction paper
  • Large googly eyes
  • Black marker (or crayon)
  • Scissors
  • Glue
  • Pencil for tracing (optional)

Directions

  • Print out the skunk craft template. Cut out each of the pieces from the template and use them as a pattern to trace and cut out each of the pieces on coloured cardstock or construction paper. You can also print out the pieces directly on coloured cardstock, or have children color the pieces with crayons.
  • Create the 3D heart for your animal to hold. Start by folding each of the five hearts in half. Add glue on one folded side of each heart and glue the halves together to create a 3D heart shape.
  • Glue the heart at the bottom of the skunk body. Close the 3D heart and add glue to one side. Open it back up, position it in the center of the body and glue it down in place. Close the heart again to reveal the unglued section. Add glue to it, open the heart again and press the glued section down onto the animal body.
  • Glue the skunk face at the top of the body. Add glue to the back of the white face strip and pink nose and glue them on the skunk face.
  • Glue the ears at the top of the skunk. Glue large googly on your skunk face. Add glue on the back of the white tail stripe and glue it onto the tail. Then glue the tail on the side of the skunk body.
  • Add glue on the back of each of the arms and glue them on the skunk body inside the 3D heart so it looks like the skunk is holding it.

ALL ABOARD: WE’RE GATHERING STEAM


Source: the-gingerbread-house.co.uk

Here’s a heart-shaped tangram inspired by the well-known Chinese puzzles. Turn it into a card for Valentine’s Day!

Materials

  • Valentine tangram puzzle sheet template (available for free download here)
  • Scissors
  • You can easily turn this tangram into a card for Valentine’s Day, in which case, you’ll need some stiff card stock, markers or something for colouring, and a glue stick to do this

Directions

  • Download and print the tangram heart puzzle template. Cut out the seven shapes along the bold lines.
  • Arrange the shapes to form a (angular) heart shape.
  • This fun puzzle activity can also be coloured in and stuck (in its heart shape) onto card stock as a Valentine’s Day card.

Spark Creative Learning!

A tangram is a two-dimensional puzzle of Chinese origin, created by cutting a square into seven pieces. The puzzle consists of one parallelogram, one square, and five different sized triangles. The goal of tangram puzzling is to reproduce various shapes that use all of the pieces with every piece touching and none overlapping. Learn more about tangrams.

CREATION STATION: PAPER + POPSICLE STICK SKATES


Source: capturingparenthood.com

If it’s too cold to go skating, bring a fun skating activity indoors with this cute, wintery craft!

Materials

  • White paper
  • Markers, bingo dabbers, or other decorating tool of your choice
  • Scissors
  • Two popsicle sticks
  • Glue
  • Hole punch
  • Yarn

Directions

  • Fold a piece of paper in two and cut out a simple boot shape, leaving the two bottom components of each skate attached. (This provides a resting spot for the popsicle stick blades when the paper is folded back together.)
  • Stamp or colour the skate boots however you like! (If your kids are heavy-handed on the dot marker stamping, your paper skates might start rolling up as they dry. Nothing that laying them flat underneath a couple of heavy books can’t fix.)
  • Once the paper is dry, attach the popsicle sticks with a small dab of glue, then proceed by gluing the two interior sides of each paper skate together. Set aside for the glue to dry completely.
  • The final step is to add the laces by simply weaving yarn through a handful of holes created using a single-hole punch. Then you can use the tops of the laces to tie the skates together!

explore more:

ALL ABOARD: WE’RE GATHERING STEAM


Source: kaplanco.com

This DIY robot hand is a simple and inventive engineering activity that will teach children all about the world of robotics! With just three common items – straws, paper, and string – kids can create a moving, bendable hand. This activity encourages exploration of robotics, engineering, and creative thinking.

Materials

  • Standard drinking straws (paper or plastic)
  • Jumbo-sized straws (smoothie straws, paper or plastic)
  • White card stock
  • Scissors
  • Pencils
  • Yarn or string (various colours)
  • Tape

Directions

  • Trace hand (adult hand recommended for larger size) onto card stock. Cut hand outline out with scissors.
  • Place hand back onto paper hand to mark location of joints. Fold the paper hand at the marked joint locations.
  • Cut the standard straws into ¼”, ½”, 1″, and 2 ¼” sizes. Tape standard straws onto hand, and tape the jumbo straw onto the wrist.
  • Using a different yarn colour for each finger, cut five strands of yarn into 2-foot-long pieces. Be sure to knot one end of each piece of yarn. Thread one yarn strand through each finger. Have all colours meet at the wrist.
  • Pull on the strings individually and in combination to explore the wonder of robotic hands!