CREATION STATION: PAPER EYEGLASSES CRAFT


Source: firstpalette.com

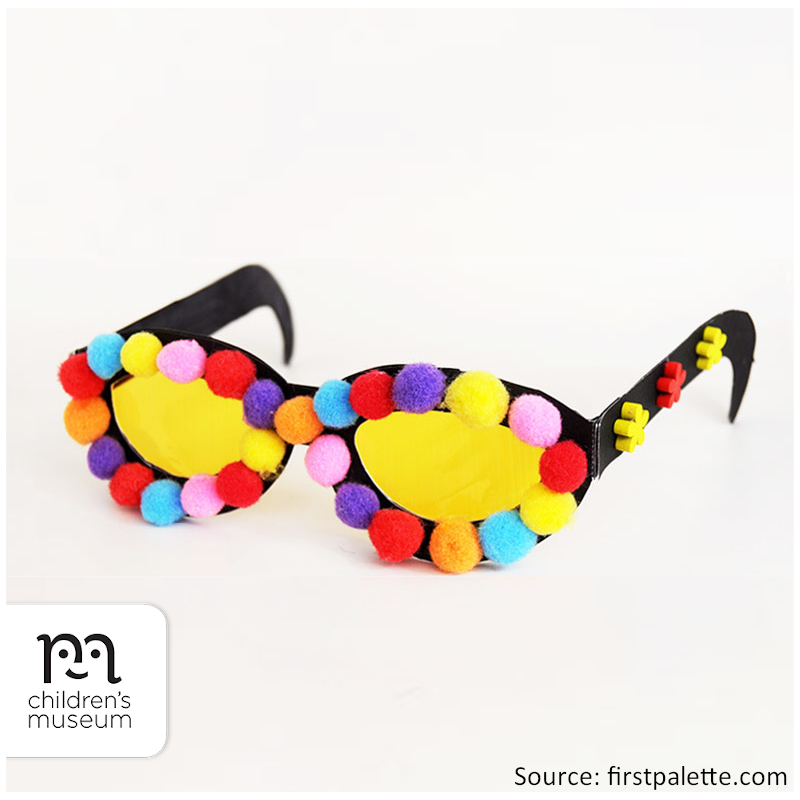
Print and craft a pair of cute paper eyeglasses using First Palette’s six fun-shaped eyeglasses templates. You can make regular-shaped eyeglasses, heart-shaped and star-shaped awesome glasses, sweet flower-shaped ones, and a pair of retro cat-eye glasses!

Materials

  • A4 or letter size cardstock
  • Cellophane paper or transparency film
  • Scissors
  • Glue
  • Crayons, coloured pencils, markers, glitter glue, washi tape, stickers, rhinestones, sequins, or whatever you want to decorate your specs

Directions

  • Choose and print out any of the glasses templates (linked here under step 1) on A4 or letter size cardstock.
  • If you chose any of the non-coloured templates, colour them with markers, crayons or coloured pencils. Use a single colour, or make it as colourful as you like. When using paint, add only a little water or none at all to prevent your paper eyeglasses from curling at the edges.
  • Cut out all three template pieces, and then cut out the eye holes.
  • The front frame has a pair of side tabs, each bordered by a dashed line. Fold the side tabs towards the back. Unfold.
  • Glue the straight end of each arm (the part that extends over the ears) onto a side tab.
  • Decorate your eyeglasses with stickers, glitter glue, small paper shapes, puffy paint, rhinestones, and other notions you want.
  • Make the lenses out of cellophane paper or transparency film. Cut a pair to a size and shape that covers each eye hole. Glue the lenses at the back of the frame.
  • Once the glue dries, try on your awesome new glasses.

explore more:

BOXING DAY AT HOME

Boxing Day

Though we’ll miss celebrating Boxing Day with you this year, here are some of our favourite family ideas for an extra special Boxing Day at home!

1. Bundle up and go for a winter walk.

Spending time outdoors is a great way to relax, re-energize, and reconnect with nature after a busy festive season. Not only is it good exercise, it’s also a lot of fun!

If you want to add a little variety to your regular neighborhood walk, here are 10 fun walk ideas for families.

2. Break out the board games for an afternoon (or evening!) of family games.

For many families, game night is a big tradition. That’s because it can be a great way to make memories in a manner that’s largely inexpensive, easy — and most importantly — fun.

Let each family member choose their favourite board game and then play each game in turn – or see this list of fun family game night ideas to help you out with your planning!

3. Get crafty with empty boxes and left-over gift wrap.

From Cardboard Skeeball and Cash Registers to Target Golf and Drive-In Movie Cars, a cardboard box can be anything you imagine it to be and more!

4. Watch a family-friendly boxset.

While limiting screen-time is normally a good thing, sometimes it can be fun to throw the rules out the window for one day. This Boxing Day, get cozy with some hot chocolate and leftover holiday snacks and tuck in with your loved ones for a family movie marathon. Bonus points awarded for festive movies titles, extra soft pillows, and snuggly duvets!

Looking for movie ideas? See Movie Marathon with Kids: Over 100 Movies for Families for tons of great themes and titles.

5. Learn something new.

The day after Christmas isn’t just a time for sitting around in your pyjamas and checking out all your presents. It’s a holiday of its own! But what is Boxing Day and what’s the history behind it?

Get the scoop on Boxing Day or explore more fun winter holiday facts at CBC Kids!

ALL ABOARD: WE’RE GATHERING STEAM


Source: steampoweredfamily.com

This bath bomb activity is meant to capture the sparkle of freshly-fallen winter snow. With this activity, kids can also study icicles and the way they look and reflect the light and see if they can think of ways to capture that feeling in the design of their bath bombs.

Materials

  • 2 cups baking soda
  • 1 cup citric acid
  • 1/2 cup cornstarch
  • 1/4 cup cream of tartar
  • 1/4 cup fine Epsom salts
  • 1/3 cup coconut oil
  • 1 tablespoon polysorbate 80
  • 10-20 drops helichrysum essential oil
  • 10-20 drops lavender essential oil
  • Light blue coloured mica powder
  • Glitter
  • Bath bomb molds
  • 2-3 cubes of white melt-and-pour soap base
  • Spray bottle filled with rubbing alcohol
  • 1 large mixing bowl
  • 1 small bowl
  • Microwave safe measuring cup
  • Spoon

Directions

  • In a large mixing bowl, add the baking soda, citric acid, cornstarch, cream of tartar and Epsom salts. Mix dry ingredients together.
  • In the measuring cup add the coconut oil. Heat in the microwave for a few seconds until it becomes a liquid.
  • Once melted, add the polysorbate 80, helichrysum essential oil, lavender essential oil, glitter and mica colour powder. Mix together with a spoon, then add to the large mixing bowl.
  • Mix all the ingredients together. I use my hands to break down any lumps and make sure everything is really mixed in there. The mixture is perfect when it holds together as you press it into your hands and feels like wet sand.
  • Take one mold and fill each side with the mixture until it is overflowing a bit. Press both sides together, using a twisting/grinding motion to get rid of any excess mixture. Gently tap each side and carefully remove the bomb. (This takes some technique and practice. Be patient. You can repack and try again as often as you need to until you get the knack of it.)
  • As you progress through making the bath bombs, you may need to spray the mix with rubbing alcohol to moisten it, so they continue to bind together.
  • Allow the bath bombs to dry for a minimum of 24 hours. A rule of thumb is that when they are hard to the touch, they are ready for the final stage: the glaze!
  • Place soap cubes into a microwave safe bowl and melt for 30 seconds and stir. Continue to melt in 30 second intervals until completely melted. You can add some glitter here or wait for the glazing stage.
  • Using a condiment or hair colouring bottle or spoon, drizzle the soap over the bombs to give them the effect of icicles. If sprinkling the glitter, do it before the soap glaze hardens.
  • Let set overnight before wrapping or packing in an airtight container.
  • Give as gifts or keep for yourself!

Using Your Icicle Bath Bombs

To use, simply fill your bath with warm water and plop the bath bomb in! Enjoy the fizzy bath bomb fun! Bath bombs are best used within a couple of weeks. Overtime the strength of the reaction will diminish.

Bath bombs must stay dry until you are ready to use them. They can be wrapped in plastic or placed in an airtight container.

Spark Creative Learning!

Bath bombs are an acid-base chemical reaction. In this recipe we have baking soda as our base and citric acid and cream of tartar as our acids. Cornstarch is a fantastic filler that helps keep our acid and base ingredients dry. This is important, because as any young scientist will tell you, when acids and bases come together, they react, but not when they are in a dry solid state like our bath bombs. To trigger the chemical reaction we need water to make the magic happen.

Another ingredient you may not recognize from the list is polysorbate 80. This is an emulsifier that helps oils mix with water. This is very important in bath bombs, where you want the ingredients to mix in with the bathwater and not float on the top like a layer of scum and stick to the sides of the bathtub. Plus, the science of emulsifiers is pretty cool – finding a way to make fat and water mix is fascinating for young scientists.

CREATION STATION: HEDGEHOG CRAFT


Source: easypeasyandfun.com

This simple hedgehog craft is fun to make and, because it has a ton of cutting, it’s perfect for working on fine motor skills with younger kids. As it’s insanely cute – you won’t be able to just make one – older kids will love making them too.

Materials

  • Brown and beige construction paper
  • Black marker
  • Scissors
  • Glue
  • Something to draw a circle with

Directions

  • Trace two circles on brown paper and cut them out. (You will need a circle and a half for 1 hedgehog.)
  • Cut each circle in half and make cones out of them, gluing the edges to secure them. You need three cones here.
  • Cut strips, making a little fringe, along one side of each cone. Curl them out a little.
  • Now nest the cones, one inside of the other, and secure with glue.
  • Trace and cut out a slightly smaller circle on the beige paper. Cut it in half and make a cone out of one half.
  • Draw eyes and a nose on the beige cone. This is your hedgehog’s face!
  • Glue the face cone outside the three stacked brown cones.
  • Enjoy your sweet new hedgehog friend!

CREATION STATION: HANDPRINT REINDEER CRAFT


Source: simpleeverydaymom.com

Kids love creating handprint crafts, and this handprint reindeer craft is perfect for young kids of all ages from toddlers to preschoolers to elementary-aged children. 

Materials

  • Coloured paper or cardstock (red, dark brown, light brown, pink)
  • White cardstock
  • Glue stick
  • Scissors
  • Reindeer template (optional, and available via subscribing at the bottom of this page)
  • Pencil

Directions

  • Print out reindeer template on white cardstock, trace onto the coloured paper and cut out all the pieces. If you’re making this craft with several children, print the second template out on the coordinating coloured paper and skip the tracing.
  • Begin making the reindeer head by gluing the inner ears in the middle of the reindeer ears.
  • Next, glue the eyes to the center of the reindeer head. Glue the big, red nose just below the eyes, near the bottom of the head.
  • Place the small pink cheeks on either side of the nose, by the bottom of the eyes and glue in place.
  • If using, glue the small brown eyebrows just about the eyes.
  • Trace your child’s hand onto the dark brown paper two times and cut each handprint out.
  • Add glue to the bottom of the child’s handprints and glue behind the reindeer’s head, with each hand slightly angled outward.

CREATION STATION: PAPER SNOWGLOBE


Source: mrsriccaskindergarten.blogspot.com

Make a cute paper snowglobe to celebrate the season!

Materials

  • Construction paper in blue and black, plus a background colour of your choice
  • Scissors
  • White paint
  • Paintbrush
  • Glue, tape, or a stapler
  • Black and orange markers, plus a colour of your choice for the snowman’s scarf

Directions

  • Cut your snowglobe shapes out of construction paper – a blue circle for the snowglobe itself, and black for the base (and the snowman’s hat, if you’re giving him one).
  • Paint your snowman (or other snowy scene) on the blue circle with white paint, then let the paint dry.
  • Add details with marker, like the snowman’s face, scarf, and buttons.
  • Glue, tape, or staple the snowglobe shape onto the black construction paper base, and add the hat.
  • Let it snow! ☃️

explore more:

Kids Playing

ALL ABOARD: WE’RE GATHERING STEAM

Source: Hello Ruby Hello Ruby is a STEAM website that doubles as a whimsical way to learn about technology, computing, and coding. They're about curiosity, playfulness and logic. Hello Ruby provides tools for kids, parents and educators to learn to understand programming in a fun and creative way. Web visitors can learn about computers, programming,…
Dec 01, 2021 • Creative learning, science, STEAM, STEAM resources, technology
Kids Playing

LOVE LOCAL: SPARK CREATIVE LEARNING IN WINNIPEG

Source: Manitoba Theatre For Young People The Snowman, the animated holiday favourite about a little boy who goes on a magical journey with his snowman, and The Hockey Sweater, the iconic Canadian Roch Carrier story about a boy forced to wear a Toronto Maple Leafs sweater in his hockey-mad Quebec town, both come to life…
Dec 02, 2021 • concert, Family fun, holiday event, love local, Manitoba Theatre For Young People, Music, theatre, Things to do in Winnipeg, winnipeg symphony orchestra
Kids Playing

CREATION STATION: HANDPRINT REINDEER CRAFT

Source: simpleeverydaymom.com Kids love creating handprint crafts, and this handprint reindeer craft is perfect for young kids of all ages from toddlers to preschoolers to elementary-aged children.  Materials Coloured paper or cardstock (red, dark brown, light brown, pink) White cardstock Glue stick Scissors Reindeer template (optional, and available via subscribing at the bottom of this…
Dec 05, 2021 • at-home crafts, Christmas, crafts, Creation Station, Family fun, holiday, winter activity

CREATION STATION: NOODLE POODLES


Source: handmadecharlotte.com

Try making oodles of poodles covered in noodles!

Materials

  • Macaroni noodles
  • White glue
  • Cardboard
  • Pencil
  • Craft knife
  • Cutting mat
  • Precision scissors (optional)
  • Paint (white and black)
  • Paintbrushes

Directions

  • Use a pencil to draw out a poodle shape on your piece of cardboard. Draw out as many as you’d like to make and cut out using a craft knife on a cutting mat, using precision scissors as needed to get any of the smaller nooks and crannies.
  • Apply a base coat of white paint onto the cardboard poodle and let dry completely. (You can skip this step, but it makes painting the macaroni noodles later easier when you don’t have to worry about coverage on the cardboard since it will already be white.)
  • Starting gluing down macaroni noodles onto the poodle! Try to leave a little room on the face uncovered so that you can paint on an eye, nose, and mouth later.
  • Once the macaroni noodles are all in place and the glue has dried, apply a coat of white paint all over the macaroni. Set aside to dry.
  • Use black paint to give the poodle an eye, nose, and mouth.

ALL ABOARD: WE’RE GATHERING STEAM


Source: littlebinsforlittlehands.com

Turn a leftover piece of styrofoam into a geoboard-inspired work of art with your kids. A few simple supplies and you can explore math and art with a bit of engineering as you make a beautiful flower or two.

Materials

  • Thick styrofoam, preferably reused – you could trying using electronics packaging if you have some!
  • White trim screws (one inch long or longer would be fine, depending on the thickness of the styrofoam)
  • Loom bands in a variety of colours
  • Pencil to trace your design on the styrofoam

Directions

  • Sketch a flower design on the styrofoam first if you want. If you don’t sketch a design directly on the foam, you’ll be able to reuse your foam blocks to create a variety of different geographic shapes!
  • Gently poke your trim screws or nails into the corners of your design.
  • Now it’s time to get creative with your rainbow loom bands. Make different shapes to design the flowers and then add shapes within the shapes if you like.
  • Check out pictures of flowers online for inspiration! Think about how you can turn a picture of a real flower into multiple shapes.
  • Take out the trim screws, pull off the loom bands, and make another design!

Spark Creative Learning!

A geoboard is a tool for exploring a variety of mathematical topics introduced in the elementary and middle grades. Learners stretch bands around the pegs to form line segments and polygons and make discoveries about perimeter, area, angles, congruence, fractions, and more. Check out this cool online geoboard simulator in addition to making your own!

CREATION STATION: SNOWMAN CRAFT


Source: cindyderosier.com

Make a cute snowman with your child as the weather turns wintery!

Materials

  • Buttons
  • Glue
  • Scissors
  • Marker
  • White and coloured construction paper

Directions

  • Cut three increasingly-sized circles from the white construction paper to form your snowman’s body and head!
  • Glue the circles together, overlapping slightly, and glue buttons on the middle circle.
  • On the smallest, top circle, glue two button eyes and a row of tiny black buttons as a mouth (you can also create a mouth with black marker). Add an orange, carrot-y nose with a triangle of construction paper or with orange marker.
  • Cut stick arms out of brown paper and attach them to the middle snowman body circle with glue.
  • Add a scarf with colourful construction paper, adding a pattern (stripes, polka dots, stars, or anything you want!) with marker.

CREATION STATION: SPONGE-PAINTED GHOST


Source: Cooking with Ruthie/I Heart Crafty Things

Enjoy this simple sponge-painted ghost craft that young kids will not only have fun creating, but it can add to any spooky home decor as well.

Materials

  • Black 12 x 12 cardstock paper
  • White paint
  • Small sponge
  • Paper plate (to pour your paint on)
  • Scissors
  • Glue stick
  • Hole punch (optional)
  • White string (optional)

Directions

  • Start by cutting a ghost shape out of your 12 x 12 black cardstock paper. You can use a pencil to draw the ghost first and then cut it out. Save the scraps from cutting out your ghost – you will use them in a minute.
  • Pour white paint onto your paper plate. Dab your sponge into the paint several times to coat it all over and then dab it onto your ghost shape. It’s okay for some of the black to show through – it’s supposed to look that way to give it more of a translucent ghost appearance. Continue dabbing into the white paint and then onto your ghost until it is covered. Set it aside to dry completely.
  • While your ghost is drying, use the black scraps left over from cutting out your ghost to cut out eyes and a mouth for your ghost. You can trace them out beforehand or cut freehand.
  • When your ghost is finished drying, glue your eyes and mouth onto it.
  • To turn your ghost into spooky Halloween decor, punch a hole at the top of it and tie some white string to it. Hang it from a mantle or a chandelier or any place you can think of to frighten (and charm!) your guests.