ALL ABOARD: WE’RE GATHERING STEAM


Source: parents.com

This fun and fun-to-build brushbot moves on its own. Just don’t expect it to clean the floors!

Materials

  • Four AA batteries
  • 6-volt battery case with wire lead terminals and an on-off switch
  • 6-volt hobby motor
  • Electrical tape
  • Washer, dime, or other small, flat object
  • Kitchen brush
  • Duct tape
  • Felt
  • Scissors
  • Tacky glue

Directions

  • Put batteries in the battery case. Connect the leads to the hobby motor (it doesn’t matter which colour lead connects to which), and secure the wires in place with electrical tape. Attach the washer to the motor’s shaft with electrical tape.
  • Attach the battery pack and motor to the brush with duct tape, and decorate as desired with felt and duct tape. (Just make sure you can still access the on-off switch!)
  • Turn it on to see it move on its bristle “feet.”

Spark Creative Learning!

This STEAM activity for kids creates a simple circuit, a closed path that an electrical current travels through. The battery provides the electricity, and the wires conduct it to the motor. When the motor’s shaft spins, the washer throws it off-balance, making the whole motor – and the brush along with it – vibrate and move.

ALL ABOARD: WE’RE GATHERING STEAM


Source: kaplanco.com

This DIY robot hand is a simple and inventive engineering activity that will teach children all about the world of robotics! With just three common items – straws, paper, and string – kids can create a moving, bendable hand. This activity encourages exploration of robotics, engineering, and creative thinking.

Materials

  • Standard drinking straws (paper or plastic)
  • Jumbo-sized straws (smoothie straws, paper or plastic)
  • White card stock
  • Scissors
  • Pencils
  • Yarn or string (various colours)
  • Tape

Directions

  • Trace hand (adult hand recommended for larger size) onto card stock. Cut hand outline out with scissors.
  • Place hand back onto paper hand to mark location of joints. Fold the paper hand at the marked joint locations.
  • Cut the standard straws into ¼”, ½”, 1″, and 2 ¼” sizes. Tape standard straws onto hand, and tape the jumbo straw onto the wrist.
  • Using a different yarn colour for each finger, cut five strands of yarn into 2-foot-long pieces. Be sure to knot one end of each piece of yarn. Thread one yarn strand through each finger. Have all colours meet at the wrist.
  • Pull on the strings individually and in combination to explore the wonder of robotic hands!

ALL ABOARD: WE’RE GATHERING STEAM


Source: littlebinsforlittlehands.com

Turn a leftover piece of styrofoam into a geoboard-inspired work of art with your kids. A few simple supplies and you can explore math and art with a bit of engineering as you make a beautiful flower or two.

Materials

  • Thick styrofoam, preferably reused – you could trying using electronics packaging if you have some!
  • White trim screws (one inch long or longer would be fine, depending on the thickness of the styrofoam)
  • Loom bands in a variety of colours
  • Pencil to trace your design on the styrofoam

Directions

  • Sketch a flower design on the styrofoam first if you want. If you don’t sketch a design directly on the foam, you’ll be able to reuse your foam blocks to create a variety of different geographic shapes!
  • Gently poke your trim screws or nails into the corners of your design.
  • Now it’s time to get creative with your rainbow loom bands. Make different shapes to design the flowers and then add shapes within the shapes if you like.
  • Check out pictures of flowers online for inspiration! Think about how you can turn a picture of a real flower into multiple shapes.
  • Take out the trim screws, pull off the loom bands, and make another design!

Spark Creative Learning!

A geoboard is a tool for exploring a variety of mathematical topics introduced in the elementary and middle grades. Learners stretch bands around the pegs to form line segments and polygons and make discoveries about perimeter, area, angles, congruence, fractions, and more. Check out this cool online geoboard simulator in addition to making your own!

ALL ABOARD: WE’RE GATHERING STEAM


Source: preschoolsteam.com

In this STEAM (engineering) activity for preschool-aged kids, help them sort and stack a variety of objects to explore the properties of materials to see how they ‘stack up’ against each other!

Materials

  • Small plastic cups
  • Craft sticks
  • Pom poms
  • Empty thread spools
  • Plastic lids
  • Any other materials you want to try stacking

Directions

  • Ask: Will all the materials stack easily?
  • Make a hypothesis: Which objects do you think will stack easily? What is it about an object you chose that will make it perfect for stacking?
  • Experiment: Begin stacking objects.
  • Observation: Does it help to have one larger object or several objects as a base at the bottom of the stack? Is it easier to stack items that are the same than it is to stack a mix of different objects?
  • Engage your young scientist(s) in conversation about why some stacks topple and others don’t. Try to think of some everyday occurrences of stacking and what you could do to make the process better. This will help apply scientific principles to the world around you.

There are properties that contribute to the success of objects being stacked one on top of the other. These include the size and weight of the objects, friction, center of gravity, and how level the surfaces of the objects are.

How much you explain to kids will depend on ages, interests and skill levels. Introducing activities promotes wonder and observation as kids explore their environment hands-on!

ALL ABOARD: WE’RE GATHERING STEAM


Source: babbledabbledo.com/science-engineering-kids-tensile-bubbles

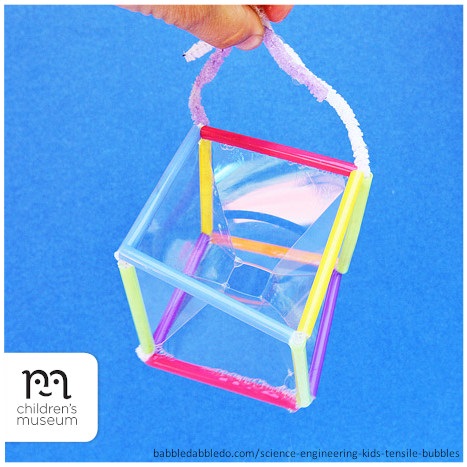
Did you know you can make a square bubble? Learn structural engineering by building 3-dimensional bubble wands and making an inverted bubble cube that mimics a tensile structure.

Click here to learn more and to find instructions for making other bubble wand shapes.

Materials

  • Straight straws
  • Pipe cleaners
  • Bubble solution
  • Tall plastic container

Directions

  • Cut your straws. First cut each straw in half, then cut in half again. You will get 4 straw sections from each straw.
  • Thread a pipe cleaner through one straw and bend the end of the pipe cleaner to secure it at the end.
  • Thread three more straws onto the pipe cleaner.
  • Bend the long end of the pipe cleaner back to meet the starting point and twist the two ends of the pipe cleaner around each other. You will now have a square shape.
  • Add three more straw sections onto the end of the long pipe cleaner.
  • Thread the pipe cleaner through one of the adjacent straw sections.
  • Add two more straw sections.
  • Bend the shape to form two sides of a cube and thread the end of the pipe cleaner through one of the straw sections on the edge of the cube.
  • Repeat the previous step to form another side to the cube.
  • Add one final straw section to complete the cube. Thread the pipe cleaner through an adjacent straw section to secure the final shape. If desired, add a straight section of straw onto the end of the pipe cleaner to form a handle.

Now it’s time to make a square bubble! To make your square bubble, have a tall container full of bubble solution. Carefully dip your wand into the solution – some frothy bubbles will form on the top of the solution as the straws are submerged. You can scoop them away with a spoon. Now lift the wand out of the solution SLOWLY. You should see a bubble cube with multiple faces! If you don’t, dip the wand into the solution again until you get an inverted bubble cube.

Spark Creative Learning!

Tensile structures are formed when a material or cable is stretched and held in tension between two or more anchors. Think suspension bridges or shade sails. They are often used to make roofs or tents. Tensile structures themselves are not always suitable for carrying large loads but they are perfect for covering large areas with a minimal amount of material and are extremely light.

This square bubble has similarities to tensile structures because they are formed as the soapy solution is stretched both between the rigid edges of the wand and the joints that form in the bubble solution itself. For more examples of what can be done with tensile structures, be sure to check out the work of designers and architects Felix Candela, Antonio Gaudi, Santiago Calatrava, and Frei Otto.

Hands-On Harley-Davidson

Hands-On Harley-Davidson™ is ready to hit the road! Developed by the Betty Brinn Children’s Museum and on display for the first time in Canada, this educational travelling exhibition  illustrates science, technology, engineering, and math (STEM) concepts through a one-of-a-kind visitor experience that lets kids Dream It!… Build It!… and Ride It!

Read More…