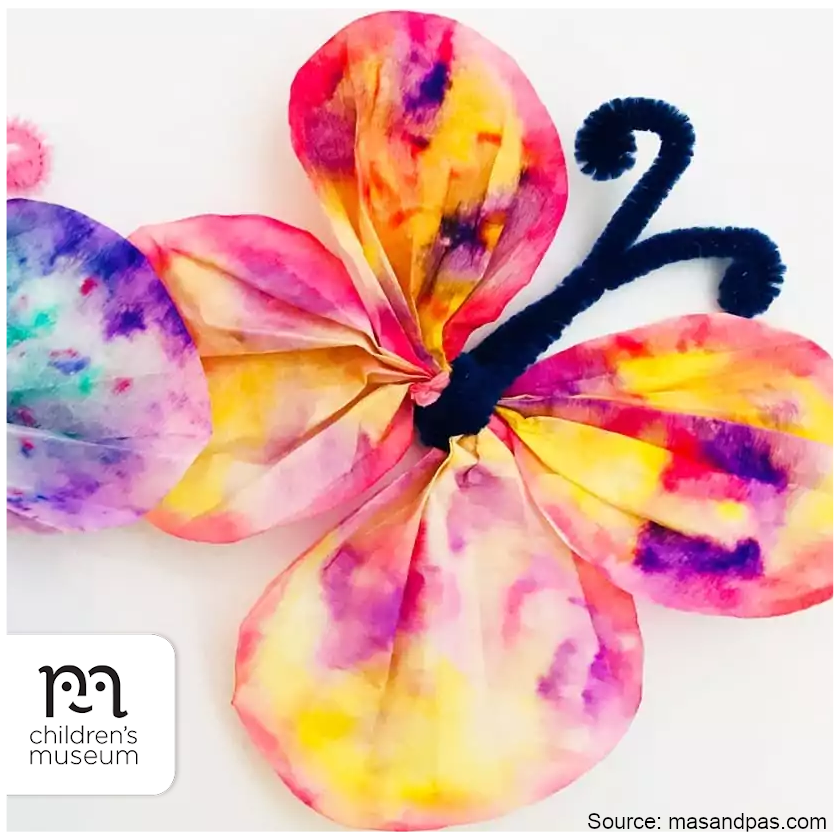
CREATION STATION: COFFEE FILTER BUTTERFLIES


Source: masandpas.com

Make a butterfly with this exciting coffee filter and watercolour technique!

Materials

  • Coffee filter papers – you need four circles for each butterfly
  • Washable felt pens
  • Pipe cleaners
  • Pipette/spray bottle/large paintbrush
  • Water

Directions

  • You need four coffee filter circles for your butterfly. Split your circles into two pairs of two coffee filters. Put each circle neatly one on top of the other so that you have two piles of two.
  • Decorate the top coffee filter with washable felt pens. Use nice bright colours and have fun making any patterns you like. Don’t worry if the designs look rough or messy at this stage. They will soon be transformed completely.
  • Place the coffee filter circles on a baking tray. (Take care not to move the undecorated bottom layers.)
  • Now for the exciting bit: drop water all over the surface. You can use a little water bottle pipette or spray bottle or even a fat paintbrush dipped in water. Cover the entire circle with water drops.
  • Then watch the colours start to blend into each other. Once the whole circle is wet, the blank coffee filter underneath will soak up the colours. You should get two matching pairs of coffee filters.
  • Separate the top and bottom layers of each pair. Put the four coffee filters onto a piece of kitchen towel to dry.
  • When they are completely dry, accordion fold each circle. Fold it one way and then another into thin accordion folds. Now you have four folded ‘wings’. Bring the top two wings together by overlapping the folds slightly. Do the same for the bottom pair of wings.
  • To tie the wings together fold a pipe cleaner in half, then wrap it around the centre of the two sets of coffee filters. Twist the pipe cleaner so all that all four pieces are held securely in place. To finish, fan out the four wing parts. Curl the ends of the pipe cleaner around to make the butterfly’s ‘antennae’.

CREATION STATION: EGG HEAD PLANTERS


Source: playdoughtoplato.com

With a quick trip to the grocery store or your refrigerator, you can create these funny egg heads!

Materials

  • Eggs
  • Seeds (lentils, chia, or mung beans work well)
  • Soil
  • Permanent markers
  • Card stock

Directions

  • Make a small hole in the top of the egg by tapping it gently with the edge of a butter knife. Carefully pick the small bits of shell out until you have a hole the size of a quarter.
  • After removing the egg, gently rub the inside of the eggshell with your finger to remove the egg’s membrane. This step is a bit tedious and isn’t strictly necessary, but if the membrane is left on, it could cause mold to grow on your sprouts as it decomposes. Rinse the shells out.
  • You can draw faces on the eggs with a permanent marker. It’s a good idea to have a few extra shells on hand in case one cracks.
  • Once the shells are rinsed and decorated, you’re ready to plant. Use a teaspoon to fill each eggshell about halfway full of soil.
  • Spoon a few seeds into each shell. For the larger seeds like mung beans and lentils, we used about a teaspoon. For tiny seeds like chia or alfalfa, a little (1/4 teaspoon) goes a long way.
  • Add water. A spray bottle works well for this step, or simply use a tablespoon to spoon a little water over the seeds. Be careful not to overwater the seeds. Since there is no drainage, the seeds can rot pretty quickly if overwatered.
  • You can also make simple egg holders to help your shells stand upright from 1/2 x 5-inch strips of card stock taped into a ring shape.
  • It should take about 3 days to see some initial growth, and a week to get some really funny looking sprout hair on your egg heads!

CREATION STATION: DUCK FINGER PUPPETS


Source: iheartcraftythings.com

These cute duck finger puppets are super easy for preschoolers and kids of all ages to make, and they make a fantastic spring craft for kids.

Materials

  • Orange, yellow, green and brown cardstock paper
  • Three-quarter inch circle hole punch
  • Green and yellow mini cupcake liners
  • Googly eyes
  • Scissors
  • Glue

Directions

  • Start by cutting out two circles for your duck finger puppets, with one that is about 3 1/4-inches for the body and one that is 2 1/2-inches for the head. If you’re making a traditional yellow duck, use yellow cardstock paper, and if you’re making a mallard duck, use green and brown cardstock paper.
  • Punch two 3/4-inch holes in the bottom of the larger circle. These are the holes for your fingers.
  • Glue the smaller circle at the top of the larger circle, making room for the cutout finger holes at the bottom of the craft.
  • Cut out a beak from orange cardstock or construction paper and glue it onto the duck face. Then glue googly eyes onto your duck.
  • Cut out a yellow or green small cupcake liner in half, and then cut one of the halves in half again to make two triangular duck wings. Glue one triangular cupcake liner wing on each side of the duck puppet.
  • Now your duck finger puppet is all ready for play! Simply place two fingers inside the puppet holes and you have an adorable duck puppet. Have him walk around and say “Quack, Quack” or fly high up in the air.

CREATION STATION: PAPER PLATE CATERPILLARS


Source: intheplayroom.co.uk

These paper plate caterpillars are super cute, and will be perfect for spring time when the kids start to spend lots of time in the garden.

Materials

  • Paper Plate (unwaxed) – one plate makes two caterpillars
  • Markers
  • Pipe Cleaners
  • Glue

Directions

  • Cut the paper plate in half. Then, cut out the middle circle away from the bordered edge. Use the circle piece for the head of the caterpillar. It will need to be trimmed down to a smaller size to fit.
  • Have the kids colour the border piece (which will become the caterpillar body). Get creative, colour them in a variety of designs!
  • Use markers to draw faces, or if you have googly eyes on hand you can also use those.
  • Cut a pipe cleaner to length, curl it with your finger to make them look like bent antennae. Attach to the back of the head with glue. Allow to dry.

CREATION STATION: BEADED WIND CHIME


Source: blog.consumercrafts.com

Make a classic wind chime with beads and personalize it to make it your own!

Materials

  • Driftwood piece or wood dowels
  • Acrylic craft paint
  • Glass or plastic beads
  • Painter’s tape (optional)
  • Jute or twine
  • Small eye hooks
  • Beading thread

Directions

  • Paint the driftwood or wood dowel. You can give it as much or as little detail as you like. If you need help making stripes, you can use painter’s tape to help section off the areas you don’t want to paint. Once the first layer is dry, you can add more details and patterns with a fine brush and contrasting colours, if you want.
  • Add hooks. This is the part that an adult will have to help with. The hooks actually go into the driftwood pretty easily, just mark the spots and start twisting them into place. For a younger child this might be hard to do, but you can always get it started for them and they can finish it.
  • Add beaded lengths to each hook with thread. You can make them the length you want – it’s also nice to make them slightly different lengths. When you’ve finished a length of beading, you can use a smaller bead and a knot to keep it in place at the end.
  • Attach the beaded lengths to the eye hooks on your piece of wood.
  • Add two eye hooks to each end at the top of your piece of wood so you can hang it up with twine. Cut a length of jute or twine, string it through the hooks, and find a place outside to hang your wind chime!

ALL ABOARD: WE’RE GATHERING STEAM


Source: 17apart.com

Regrow your own celery in a sunny window this spring!

Simply chop the base from a bunch of celery, leaving about 2 inches. Place this 2-inch cutting in a dish of water in a sunny location. You’ll have to wait for about 5-7 days to see new growth starting from the centre of the cutting.

After about a week or two, you can transplant the cutting to a pot with soil, burying the cutting in soil and leaving any new leafy growth in the centre to peek above the soil. Give it plenty of water and monitor it for signs of dryness or excess moisture.

The leafy centre will continue growing and start producing its own stalks, which you can start harvesting and snacking on!

Tips for growing and harvesting celery:

  • Celery does not grow well in hot conditions, so make sure you give your celery plant adequate water and shade during the hottest part of the day. If your plant does not receive enough water, it could become tough and stringy.
  • Change out the water every couple of days while in the initial water dish phase of the project.
  • When transplanting, you can also plant the celery directly into the soil outside – you may want to go this route if you live in a temperate area or want to be able to harvest outdoors.
  • You can remove only a few stalks of celery at a time – there’s no need to harvest the whole plant. When doing this, make sure you remove the outer stalks first and let the less developed inner stalks continue growing. Take care not to damage the rest of the plant if removing individual stalks.

CREATION STATION: TISSUE PAPER FLOWERS


Source: easypeasyandfun.com

You can make a wonderful bouquet for mom with this tissue paper flower craft.

Materials

  • Bright pink, light pink, and white tissue paper – or whatever colours you want!
  • Scalloped circle cookie cutter
  • Pen or pencil
  • Scissors
  • Wood craft sticks
  • Green craft paint
  • Stapler
  • White school glue

Directions

  • Paint each craft stick with your green craft paint and let dry (they dry quickly with one coat).
  • Fold or layer your tissue paper so it is about 10 sheets thick, place your cookie cutter on top, and trace it with a pen or pencil.
  • Hold your tissue paper together and cut all 10 pieces together.
  • Remove the top piece outlined with pen or pencil, and staple the remaining 9 pieces together in the centre.
  • One piece at a time, start bunching the top piece upwards and continue until you reach the bottom, but leave the bottom layer flat.
  • Glue one flower to the top of each green craft stick and let dry.
  • Make several flowers and gather them into a bouquet for gift-giving.

LOVE LOCAL: SPARK CREATIVE LEARNING IN MANITOBA


Source: sciencerendezvous.ca

Science Rendezvous is happening all over the country on May 8, and Manitoba organizations are hosting several activities that teachers and families will want to take part in.

Join the University of Manitoba and the University of Winnipeg for virtual Science Chase activities on May 8. Test your knowledge of our diverse Manitoba ecosystem!

This year, Science Rendezvous Winnipeg has also partnered with Trees Winnipeg and Manitoba Agriculture & Resource Development (ARD) to plant up to 5,500 trees! Trees (white spruce) and educational materials will be available to Manitoba elementary schools, grades 5-6. Trees can be delivered to schools for FREE. Schools are encouraged to organize their own safe outdoor socially-distanced tree planting activities or giveaways.

Learn more about Science Rendezvous.

CREATION STATION: MAKE YOUR OWN PLANTABLE SEED PAPER


Source: thesprucecrafts.com

Seed paper is produced by mixing recycled paper pulp with seeds and pressing the mixture into a shape. You can use plain white paper, newspaper, tissue paper, cardboard, and most other types of paper (besides paper with a glossy finish) to create the pulp. Seed paper can be planted in soil, where the seeds should grow if the soil is kept moist. Seed paper is excellent to use for gift tags and cards. Be sure to include directions for the recipient that they can plant the paper, and tell them which seeds you used. 

Materials

  • Paper of your choice (not glossy or coated)
  • Water
  • Plant seeds of your choice
  • Blender
  • Mixing bowl
  • Plastic wrap or parchment paper
  • Cookie cutters (optional)
  • Paper towels or cloth
  • Hairdryer (optional)

Directions

  • Tear the paper into small pieces, and place it in the blender. Then, add twice as much water as paper. (For example, if the paper reaches the 1 cup mark on the blender, add 2 cups of water.) Blend the paper into a pulp, and then transfer it to the mixing bowl. Squeeze the water from the pulp, and make sure there aren’t any large chunks of paper in it.

  • Next, add a handful of seeds to the paper pulp. The number of seeds required will depend on the type of seeds you use and the finished effect you are looking for. For instance, if you have somewhat large seeds you might not want to use that many of them. Or maybe you want the paper to be dotted with lots of smaller seeds.

  • Mix the seeds into the pulp using your hands or a spoon. (Don’t use the blender, which can damage the seeds.)

  • If you are using cookie cutters as molds to make specific paper shapes, place them onto a piece of plastic wrap or parchment paper. Then, press the paper pulp firmly inside the cookie cutters for even coverage, and remove the cookie cutters.

  • If you aren’t using cookie cutters, simply press the paper pulp on plastic wrap or parchment paper into your desired shape. Try to spread the pulp fairly thin, as a thick layer will take longer to dry. Use a paper towel or cloth to press as much water as possible from the pulp.

  • Drying the seed paper quickly is essential. Otherwise, the seeds might start to sprout. Place the seed paper in a warm environment, and ensure that air can circulate around it. Blowing the seed paper with a hairdryer on the cool setting can help it dry.

  • When the seed paper is thoroughly dry it can be finished as desired. For example, you can decorate it with stamps or writing utensils. And you can punch a hole in it, through which you can feed a ribbon or string to use the paper as a gift tag.

explore more:

Kids Playing

SHOP FEATURE 5

(For the week of May 3, 2021) Check out this week’s Feature 5 – a list of top-selling products from Shop, the Children’s Museum’s gift store, now with FREE shipping in Winnipeg on orders over $25! Read More… KidzLabs Bubble Science Kit Price: $22.99 The ultimate bubble science kit! Perform amazing experiments with everyday materials!…
May 04, 2021 • arts and crafts, feature 5, Games and Puzzles, science, shop, Shop Feature 5
Kids Playing

ALL ABOARD: WE’RE GATHERING STEAM

Source: ingenium.org Explore Ottawa's Ingenium family of museums - the Canada Agriculture and Food Museum, the Canada Aviation and Space Museum, and the Canada Science and Technology Museum - on their webpage devoted to at-home education. With their wide array of engaging and online resources (perfect for parents, teachers, and students), you can browse online…
May 05, 2021 • At-home Experiments, Creative learning, ingenium, science, Science Experiments, STEAM, STEAM activity
Kids Playing

LOVE LOCAL: SPARK CREATIVE LEARNING IN MANITOBA

Source: sciencerendezvous.ca Science Rendezvous is happening all over the country on May 8, and Manitoba organizations are hosting several activities that teachers and families will want to take part in. Join the University of Manitoba and the University of Winnipeg for virtual Science Chase activities on May 8. Test your knowledge of our diverse Manitoba…
May 06, 2021 • Let’s Talk Science, love local, outdoor activities, spring activities, University of Manitoba, university of winnipeg

CREATION STATION: FLOWER NECKLACE


Source: homeschoolantics.com

Make a flower necklace to wear to your next party!

Materials

  • Drinking straws
  • Yarn
  • Construction paper in a variety of colours
  • Scissors or flower-shaped paper puncher
  • Hole puncher

Directions

  • Cut out flowers from the construction paper either with a flower-shaped paper puncher, freehand, or by tracing flower shapes and then cutting them out with scissors.
  • Use the hole puncher to makes holes in the centre of each flower.
  • Cut your straws into approximately one inch lengths. Next, cut a string of yarn to the desired length you’d like to make your necklace.
  • String those flowers and straws! When you’ve got it to your desired length, just tie off the ends.
  • Wear your new homemade necklace!